
2M+ followers watch us recover data on YouTube, TikTok & Instagram - watch real cases ↗

Free DIY tool · No email required

Diagnose your failing hard drive - then recover it safely

Answer a few quick questions about how your drive sounds and what CrystalDiskInfo reports. This free tool tells you whether it is safe to attempt a DIY recovery - and walks you through it step by step - or when to stop before you turn a recoverable drive into a lost cause.

Interactive diagnostic

Let’s figure out what’s wrong - safely

A few quick steps. We will never have you do anything that risks your data - and if your drive needs a lab, we tell you straight. Nothing is stored, and no email is required.

Step 1 of 5How drives work

First, how your drive works

Hard drives store data on spinning platters. Tiny read/write heads float nanometers above the platter surface while reading and writing. If the drive is unstable, repeated power cycling or heavy scanning can cause the heads to contact the platters and permanently scratch away data.

Do not keep unplugging and replugging the drive, and do not run repair tools before finishing this diagnostic.
Complete written recovery guide

Prefer reading? The whole process, written out.

This guide covers everything the interactive tool teaches: how to identify your drive’s failure type, how to create a bootable recovery USB on Windows, how to run a two-pass ddrescue clone, how to scan the clone with R-Studio, and - critically - when DIY recovery is no longer safe and professional cleanroom help is the only option.

The core principle

Overview

The tool above walks you through your drive’s symptoms - how it sounds when powered on, whether it’s detected, and what CrystalDiskInfo reports - then routes you to the safest course of action. The central principle throughout is clone first, recover from the copy. Running repair tools or file recovery software directly on a failing drive is one of the most common ways people permanently lose data they could have recovered.

Good news - if your drive spins and stays spinning: there is a strong chance your data can be recovered with the DIY clone-first approach described here. A SMART status of Good or Caution in CrystalDiskInfo means DIY recovery is worth attempting.

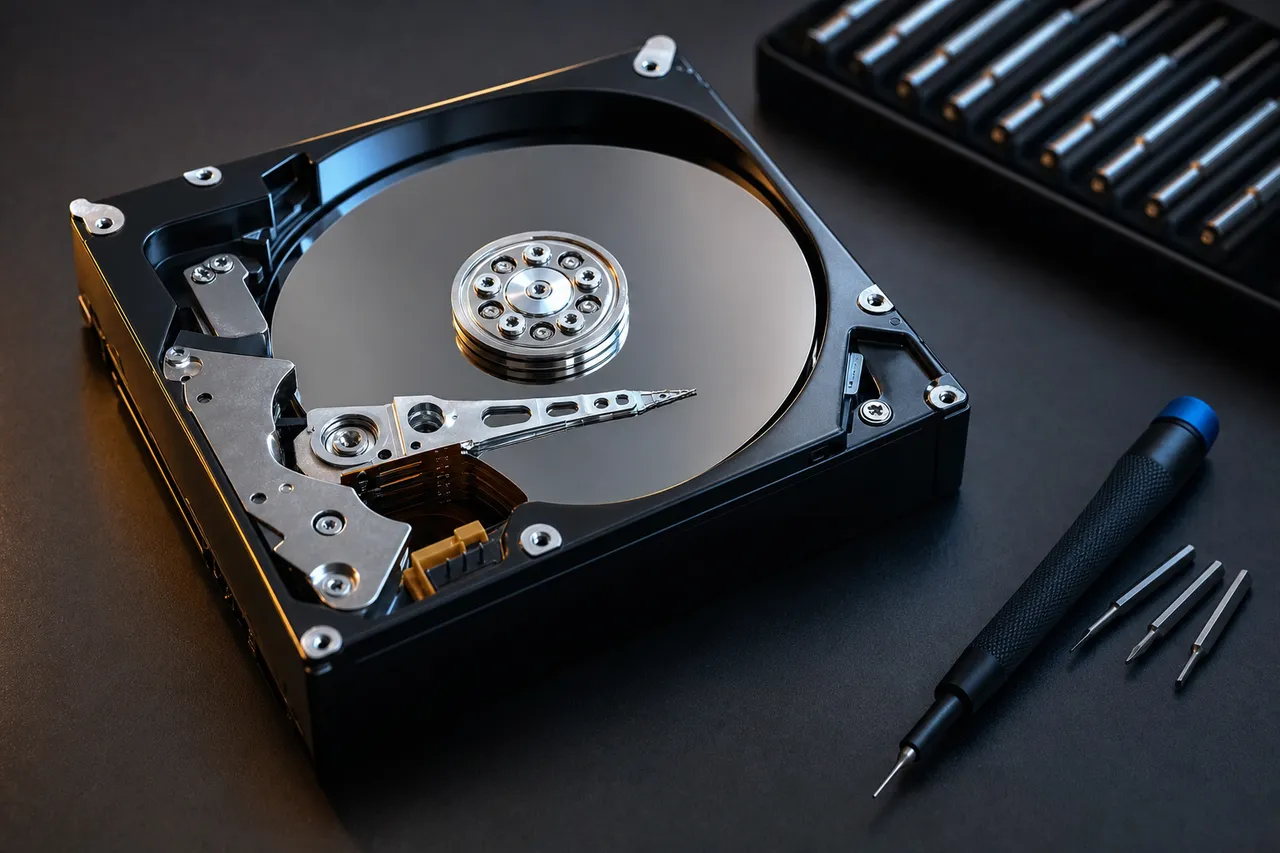
An opened hard drive showing the platters and read/write head - where your data physically lives
Your files live on these platters. Clone first - then recover from the copy.
Is this guide for you?

Who this is for

This guide is written for people who:

  • Have a failing hard drive and want to understand what is wrong before spending money on professional recovery.
  • Are comfortable following detailed, step-by-step technical instructions - no prior Linux experience required.
  • Have access to a Windows PC for creating a bootable USB and running recovery software.
  • Have or can obtain a second empty drive (same size or larger) to use as a clone target.
  • Are willing to take the time - cloning can take many hours or days, and rushing it risks losing data.
  • Want to try a careful DIY approach before considering professional services.
Not for clicking, non-spinning, or spin-down drives. Those symptoms indicate physical hardware failure requiring cleanroom professional recovery. See When To Stop below.
Gather these first

What you need before starting

Gather everything on this checklist before moving forward. Do not begin without all of them.

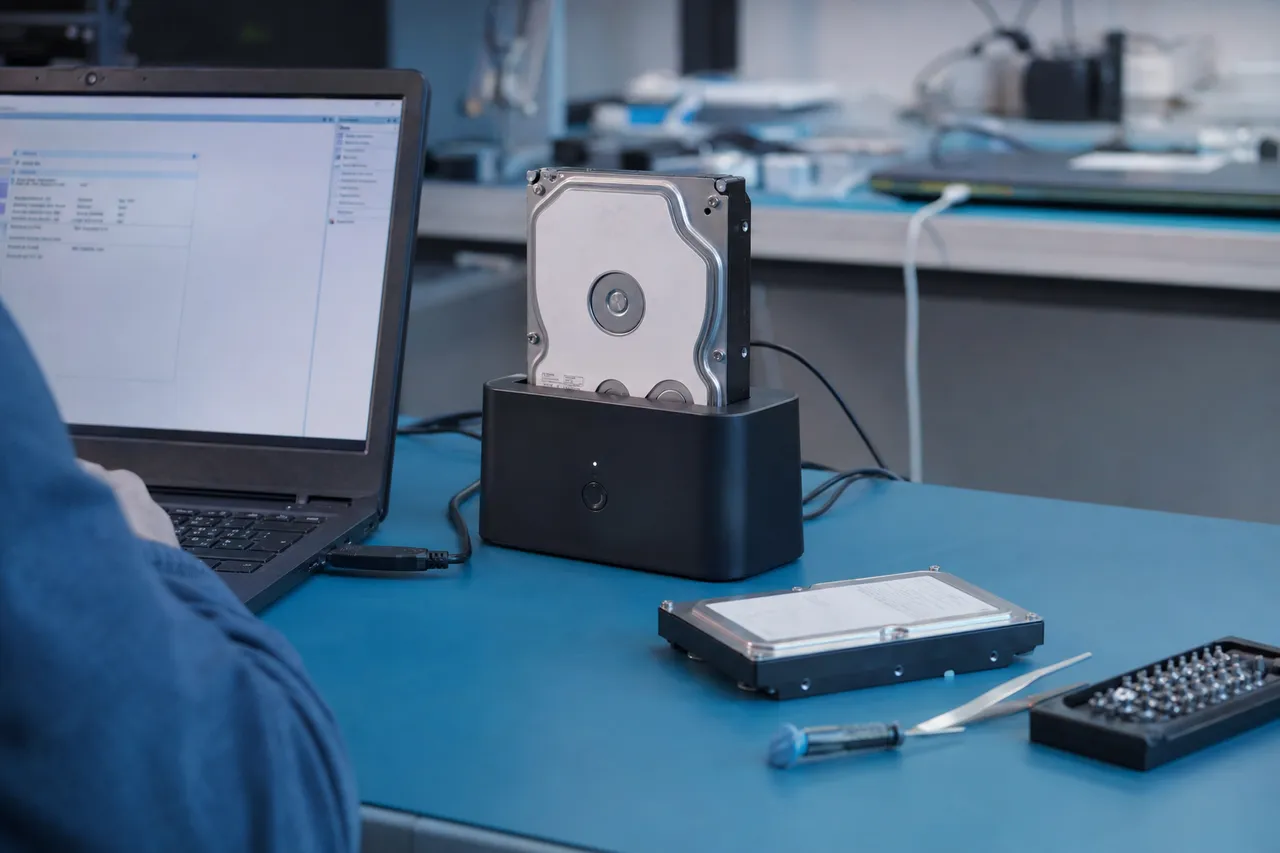
A bare hard drive in a powered SATA docking station connected to a laptop, with an empty target drive ready for cloning
The DIY clone setup: the failing drive in a powered dock, a separate empty target drive, and a Windows laptop.
  • A working Windows computer - Required for creating the boot USB and running R-Studio. A Mac cannot be used to create the SystemRescue USB in this guide.
  • USB flash drive, 8 GB or larger - Will be completely erased and turned into a bootable SystemRescue drive.
  • A new, empty target drive - Same size or larger than your failing drive. This is where ddrescue writes the clone. It will be completely overwritten - confirm it contains nothing important.
  • The failing patient drive - Handle it carefully. Minimize power cycles - each one risks additional damage.
  • SATA docking station or USB-to-SATA adapter - 3.5-inch drives need a powered docking station. 2.5-inch SATA drives can use a USB adapter cable. USB-native drives (soldered USB) use their original cable.
  • Time and patience - Cloning a large or damaged drive can take many hours or even days. Do not interrupt the process.
  • Stable power throughout - Keep a laptop plugged in for the entire clone. On a desktop, a UPS (uninterruptible power supply) is ideal - a power loss mid-clone can force you to restart from the beginning.
  • A destination for recovered files - A separate external drive is recommended. Alternatively, your computer’s internal drive works if it has enough free space. This must be separate from the clone and the patient drive.
Windows only. Creating the SystemRescue bootable USB requires a Windows computer and Rufus. This specific process is not supported on macOS. If you only have a Mac, borrow a Windows PC for this step before continuing.
6 phases · 17 steps

Step-by-step recovery guide

Six phases, seventeen steps - from first diagnosis through verified file recovery.

Phase 1 · Prepare

  1. Understand how your drive works

    Hard drives store data on spinning platters. Tiny read/write heads float nanometers above the platter surface while reading and writing. If the drive is unstable, repeated power cycling or heavy scanning can cause the heads to contact the platters and permanently scratch away data.

    Do not keep unplugging and replugging the drive. Do not run repair tools before completing the diagnostic.

  2. Remove from external enclosure (if applicable)

    If your drive is inside a plastic external enclosure, open the shell to reach the bare drive. Look for screws hidden under rubber feet or stickers. Use a plastic spudger to gently pry along the seam - go slow and work around the edges.

    Only open the outer plastic enclosure - never open the metal hard drive itself. Avoid metal tools near the PCB circuit board on the underside of the drive.

  3. Remove the USB adapter board (if present)

    Some drives in external enclosures have a removable USB-to-SATA bridge board attached to the bottom. Disconnecting it exposes the standard SATA connectors (two L-shaped ports). If the USB port is soldered directly onto the drive’s main circuit board, leave it alone and recover using USB.

    Do NOT attempt to desolder or modify the main circuit board in any way.

  4. Connect the drive safely

    Use the right connection for your drive: a powered docking station for 3.5-inch desktop drives, a SATA-to-USB adapter for 2.5-inch SATA drives, or the original USB cable for drives with a soldered USB port. A stable connection is essential - loose adapters can disconnect mid-clone and corrupt the log file.

    Do not click Format, Initialize Disk, or Repair prompts. Do not run CHKDSK on the patient drive.

  5. Perform the listen test

    Power on the drive and listen carefully. The sound pattern is the fastest indicator of failure type: not spinning (likely PCB or motor), clicking (head failure), spinning up then down (head failure, drive self-protecting), or spinning and staying spinning (most favorable - software recovery may work).

    Do not keep power-cycling to repeat the test. One or two power-ons is enough. Do not open the sealed drive enclosure.

  6. Check SMART health with CrystalDiskInfo (Windows)

    If the drive spins and stays spinning, download CrystalDiskInfo (Windows only, free), install it, and open it. Find your drive and note the health status: Good, Caution, Bad, or not detected. Only proceed with DIY cloning if the status is Good or Caution.

    If CrystalDiskInfo shows Bad or the drive does not appear in the list, stop here. See the When To Stop section below - no DIY path is safe for either of those outcomes.

Phase 2 · Create Boot USB

  1. Download SystemRescue ISO and Rufus (Windows)

    Download the SystemRescue ISO from system-rescue.org and Rufus from rufus.ie. Both are free. A Windows computer is required for this step - creating the USB on a Mac is not supported in this guide. If you only have a Mac, borrow a Windows PC.

  2. Flash the USB with Rufus

    Insert your USB flash drive. Open Rufus, click Select and choose the SystemRescue ISO you downloaded. Click Start. Accept any warning about erasing the USB contents. Wait until Rufus reports it has finished - do not remove the USB early. Everything currently on the flash drive will be erased.

Phase 3 · Boot and Identify

  1. Boot from the SystemRescue USB

    With the USB plugged in, restart the computer. As the manufacturer logo appears, immediately press your boot menu key. Common keys by brand: Dell F12, HP F9 or Esc, Lenovo F12, ASUS F8, Acer F12, MSI F11, Gigabyte F12. Select the USB from the boot menu, press Enter, then choose the default SystemRescue option. You will arrive at a command-line prompt.

    If the boot menu does not appear, try tapping the key rapidly as the screen first turns on. If Secure Boot is blocking it, disable it temporarily in your BIOS settings.

  2. Identify your drives with lsblk

    At the command prompt, type lsblk and press Enter. This lists every connected drive with its device name (like /dev/sda, /dev/sdb) and size. Match your patient drive and target drive to their known sizes. Write down the exact device names on paper before touching anything else.

    root@sysrescue# lsblk

    NEVER GUESS. If you are not 100% certain which drive is which, stop, power off, and connect only one drive at a time to confirm. Cloning to the wrong drive permanently and irreversibly destroys its data.

Phase 4 · Clone with ddrescue

  1. Run ddrescue Pass 1 - fast copy

    Type the command below and press Enter. Replace sdX with your patient drive name and sdY with your target drive name from the previous step. Let Pass 1 run until it finishes on its own - do not interrupt it. Pass 1 copies all readable sectors quickly while skipping difficult ones, minimizing stress on the failing drive. The rescue.log file tracks progress and enables safe resume.

    root@sysrescue# ddrescue -f -n /dev/sdX /dev/sdY rescue.log
  2. Run ddrescue Pass 2 - retry difficult sectors

    After Pass 1 finishes, run the command below. This retries sectors that could not be read in Pass 1. The same rescue.log is reused - ddrescue picks up exactly where it left off. This pass can take many hours or days on a heavily damaged drive.

    root@sysrescue# ddrescue -d -f -r3 /dev/sdX /dev/sdY rescue.log

    If the patient drive starts clicking loudly during cloning, press Ctrl + C immediately, disconnect the patient drive, and contact a professional recovery lab.

Phase 5 · Scan with R-Studio

  1. Prepare for file recovery

    When ddrescue is done: shut the computer down completely (do not just restart). Disconnect the patient drive and set it aside safely - do not reconnect it. Remove the SystemRescue USB. Boot normally into Windows. Then connect the cloned drive as an external secondary drive via a USB docking station or enclosure.

    Do NOT boot from the clone. Do NOT allow Windows to scan and fix or repair the clone - click Cancel on any repair prompt immediately. Every write to the clone risks overwriting data you have not yet recovered.

  2. Install and open R-Studio (Windows)

    Download and install R-Studio from r-studio.com (Windows only, free trial available). Open it. In the left panel, find your cloned drive by its drive letter or size. Do NOT select your Windows system drive (usually C:) or the destination drive.

  3. Scan the cloned drive

    Click Scan with all settings left at their defaults - R-Studio automatically chooses the best options. Wait for the full scan to complete. Depending on drive size this can take 30 minutes to several hours. Do not interrupt it.

Phase 6 · Recover Files

  1. Browse results and select files

    R-Studio shows a folder tree of what it found. Look for folders that match your data - Documents, Desktop, Photos, and so on. Check the boxes next to what you want to recover. Prioritize the most important files first. If files have unusual names like $Recf0001, browse inside them - the content may be intact even if the directory entry was lost.

  2. Recover to a safe destination

    Click Recover and choose where to save the files. Use a separate external drive (recommended) or your computer’s internal drive if it has enough free space. Neither the cloned drive nor the patient drive are valid destinations. Wait for recovery to finish, then open the destination folder and verify your files can be opened.

    Never save recovered files back onto the cloned drive or the original patient drive. Writing to the clone overwrites sectors containing data you have not yet recovered - and once overwritten, that data is permanently gone.

When to stop

Hard-stop conditions - put the drive down

Five conditions require you to stop all DIY activity immediately. Software tools cannot help in any of these cases, and continued attempts will reduce - or permanently eliminate - the chance of successful professional recovery.

Drive is not spinning

Stop

A drive that does not spin at all cannot be helped by any software tool. This is a hardware-level failure requiring professional equipment.

  • Most common cause - PCB failure: The printed circuit board (the green electronics board on the drive’s underside) has failed. The motor never receives a start signal.
  • Also possible - seized spindle motor: The motor inside the drive has physically seized and cannot rotate the platters. Requires cleanroom disassembly.
  • Why DIY PCB swaps do not work: Every drive PCB contains a ROM chip storing unique adaptive calibration data for that specific drive. Swapping a donor board without transferring the ROM will fail - the drive will not recognize its own platters.
  • Modern drives (post-2013): Many store adaptive data in the MCU (microcontroller unit) rather than a separate ROM chip. MCU transfer requires BGA rework equipment - far beyond any DIY capability.
  • If the ROM chip is physically damaged: Recovery may be impossible, even by professionals.
  • Motor seizure: Opening the drive to address this requires an ISO-5 certified cleanroom (10,000 times cleaner than typical indoor air). A single dust particle on the platters during disassembly can destroy all data permanently.

Stop powering the drive on and off. Each power cycle applies stress to an already-failed component and can worsen the damage. Your data is very likely still on the platters - but only a professional recovery lab can reach it. If you are not near a local recovery facility, you can send your drive for evaluation through a secure mail-in process.

Drive is clicking

Stop

Clicking is one of the clearest signs of a read/write head failure. The actuator arm is stuck in a loop: attempting to position the heads, failing, resetting, and trying again. This is a physical and mechanical failure - no software command can fix it.

  • What is happening: One or more read/write heads have failed. The drive cannot complete its startup or find the data it is looking for.
  • Why each power cycle makes it worse: When a drive with a failed head spins up, the head can drag across the platter surface instead of floating above it. This physically scratches the magnetic coating where your data is stored - a type of platter damage that drastically reduces recovery success if left unaddressed. Even a single additional power cycle can reduce how much is recoverable.
  • Why software tools cannot help: ddrescue and R-Studio communicate with the drive through the operating system. If the heads cannot read the system area, the drive is either invisible to the OS or goes offline almost immediately. There is no software workaround for a hardware head failure.
  • What professional recovery involves: The head stack assembly is replaced in a certified cleanroom with a matched set from a compatible donor drive. Once working heads are installed, technicians image the drive sector by sector and extract your files.

Stop powering the drive on. Do not run scans or cloning attempts. Do not open the drive outside a cleanroom. Contact a professional hard drive data recovery service immediately - the fewer additional power cycles, the better your chances.

Drive spins up then spins down

Stop

The drive starts its startup sequence, attempts to initialize the read/write heads, fails, and shuts itself down to avoid further damage. This is the drive’s built-in self-protection mechanism activating.

  • Most common cause: One or more read/write heads have failed and cannot read the drive’s internal system area. Without reading that information, startup cannot complete.
  • Why software tools cannot help: ddrescue and R-Studio need the drive to stay online and stable. This drive powers down before any data transfer can begin - there is nothing for the software to work with.
  • Why continued power cycles cause more damage: Every spin-up attempt forces the failing heads across the platters. Each attempt risks scratching the magnetic surface where your data is stored.
  • What is required: Cleanroom head stack replacement using a precisely matched compatible donor drive.

Stop all DIY attempts. Do not run scans. Do not open the drive outside a cleanroom. The sooner the drive receives a professional data recovery evaluation, the better your recovery chances. MDRepairs also offers a mail-in data recovery option if you are not located near a recovery lab.

Drive not detected - including not visible in CrystalDiskInfo

Stop

If the drive does not appear in CrystalDiskInfo or is not recognized by the computer at all, the computer is not communicating with it - and DIY software cannot help a drive the OS cannot see.

  • Cause 1 - failing USB-to-SATA bridge: External USB drives contain a bridge board that converts the SATA signal to USB. If this bridge is failing, the drive may not be detected even though the drive itself is fine. Try bypassing the enclosure and connecting the drive directly via SATA. If it appears via direct SATA, the bridge was the problem.
  • Cause 2 - firmware or translation issue: Internal firmware problems can prevent the drive from identifying correctly, even on a direct SATA connection. Firmware-level diagnosis and recovery requires professional tools.

Do not keep unplugging, replugging, or power cycling the drive. Do not run scans or cloning attempts if the drive is not detected - they will find nothing and risk additional stress on the hardware.

CrystalDiskInfo reports “Bad”

Stop

A Bad SMART status means one or more critical health attributes have exceeded their failure threshold. The drive is actively failing.

  • Data at risk: Continuing DIY recovery on a drive in Bad health can permanently destroy data that would otherwise be recoverable.
  • Reads add stress: Running file recovery software directly on a drive in this state is not safe - each additional read operation stresses the drive further.
  • Recommendation: Professional recovery is strongly recommended. Do not attempt further DIY.

Do not continue DIY. A hard drive data recovery professional should evaluate the drive before it degrades further.

ddrescue commands

The two ddrescue passes, explained

GNU ddrescue is a data recovery tool that creates a sector-level copy of a failing drive onto a healthy target drive. Unlike a regular file copy, ddrescue skips difficult sectors on the first pass to avoid prolonged stress, then retries them in a targeted second pass. It saves a log file so the operation can be safely paused and resumed without re-copying data already transferred.

ddrescue runs from a bootable Linux environment. This guide uses SystemRescue, which includes ddrescue pre-installed. It does not run from within Windows. Note: the commands below are examples - always verify the correct device names on your specific machine using lsblk before running either command.

Critical - do not mix up patient and target. sdX is always the patient drive (source - your failing drive). sdY is always the target drive (destination - your empty clone drive). Reversing these two arguments will completely and permanently erase your patient drive. ddrescue starts immediately with no confirmation prompt. Confirm device names with lsblk first.

Pass 1 - fast copy

Run this first. It copies all readable sectors quickly and skips sectors that are difficult to read, minimizing the number of times the failing drive is stressed. Let it run until it finishes on its own - do not interrupt it.

root@sysrescue# ddrescue -f -n /dev/sdX /dev/sdY rescue.log
-f
Force overwrite of the target (required when writing to a whole disk device).
-n
No scraping: skip bad sectors on this pass rather than retrying them.
rescue.log
Progress log file. Tracks which sectors have been copied. Enables safe pause and resume.

Pass 2 - retry difficult sectors

After Pass 1 finishes, run this second command. It targets only the sectors that could not be read during Pass 1. The same rescue.log is reused - ddrescue resumes exactly where it left off. This pass can take many hours or days on a heavily damaged drive.

root@sysrescue# ddrescue -d -f -r3 /dev/sdX /dev/sdY rescue.log
-d
Direct disc access: bypasses the OS read cache for more accurate sector-level reads.
-f
Force overwrite of the target (same as Pass 1).
-r3
Retry each bad sector up to 3 times before giving up on it.

Tips during cloning

  • If ddrescue appears stuck on one sector for 30 minutes or more, you can safely press Ctrl + C and run Pass 2 directly - it will retry those stuck areas.
  • If the patient drive disconnects mid-clone, stop ddrescue with Ctrl + C, reconnect it firmly, and run the same command again. The log file enables safe resume without re-copying already-transferred data.
  • If the patient drive begins clicking loudly during cloning, stop immediately, disconnect the patient drive, and contact a professional recovery lab.
  • The target drive must be the same size or larger than the patient drive. Even drives advertised with the same capacity from different manufacturers may differ by a few gigabytes.
  • Keep your laptop plugged in throughout - a power loss mid-clone may require restarting from the beginning.
R-Studio recovery guide

Pull your files off the clone with R-Studio

R-Studio is a professional file recovery application for Windows. After ddrescue has finished cloning, you connect the cloned drive to your Windows machine and use R-Studio to scan it, find deleted or lost files, and extract them to a safe destination. You always work from the clone - the original patient drive remains disconnected throughout this entire process.

Setup required before opening R-Studio
  • The patient drive must be disconnected and stored safely before you begin.
  • The cloned drive must be connected externally via a USB docking station or enclosure - not installed internally, and not used as a boot drive.
  • If Windows prompts you to scan or repair the drive when you plug it in, click Cancel immediately. Allowing automatic repair can overwrite data you have not yet recovered.
  1. Download and install R-Studio

    Get R-Studio from r-studio.com. A free trial lets you preview what is recoverable before purchasing. Install it on your Windows machine (not on the cloned drive).

  2. Select the cloned drive

    In R-Studio’s left panel, find the cloned drive by its drive letter (D:, E:, etc.) or its size. Do NOT select your Windows system drive (usually C:) and do not select the destination drive where you plan to save recovered files.

  3. Scan with default settings

    Click Scan. R-Studio automatically selects the best scan settings for the drive - you do not need to change anything. Wait for the scan to complete fully. This can take 30 minutes to several hours. Do not interrupt it.

  4. Browse results and select files

    Browse the folder tree and locate your data - Documents, Desktop, Photos, and similar folders. Check the boxes next to files and folders you want. Prioritize the most important data first. Files with unusual names (like $Recf0001) may still contain intact content - browse inside them and check thumbnail previews for images.

  5. Recover to a safe destination

    Click Recover and choose your destination: a separate external drive (recommended), or your computer’s internal drive if it has enough free space. Wait for recovery to finish, then verify the files can be opened.

    Never save recovered files back onto the cloned drive or the original patient drive. Saving to the clone overwrites sectors that may contain data you have not yet recovered - those sectors are then permanently gone.

Three drives, three roles - keep them separate

Patient drive

Disconnected and stored safely. Do not touch it again.

Cloned drive

Connected externally via USB dock. Scanned by R-Studio. Read-only - do not save anything to it.

Destination drive

A separate external drive, or your internal drive if it has enough free space. This is where recovered files land.

If R-Studio shows no files or an empty result: the partition table may be corrupted. Try the "Find Previous File System" option or switch the scan type to "Extra Found Files." If the drive still shows nothing after trying both, the damage may be more severe than software can address - see Get Help for professional recovery options.
Common mistakes to avoid

The six errors that lose recoverable data

Most "unrecoverable" drives were made worse after the failure, not by it. Avoid these and you keep your odds high.

  • Running CHKDSK on the patient drive

    CHKDSK writes to the drive and can overwrite recoverable data. It also corrupts file system structures that recovery software uses to find files. Never run it on the patient drive - only on the clone if needed.

  • Repeated power cycling

    Every time you power on a damaged drive, you risk additional mechanical damage. For clicking or spins-down drives, each power cycle can reduce how much data is recoverable or make recovery impossible.

  • Saving recovered files back onto the clone

    The clone must stay read-only throughout recovery. Writing files to it overwrites sectors that may still contain data you have not yet recovered - and those sectors are gone permanently once overwritten.

  • Mixing up patient and target drives

    Reversing source and destination in a ddrescue command erases the patient drive with no warning or undo. Always confirm device names with lsblk and physically label both drives with tape if there is any risk of confusion.

  • Using an unstable USB adapter for cloning

    A loose or cheap USB cable can disconnect mid-clone. If the connection drops during the process, the log file may become inconsistent. Use a SATA docking station whenever possible for a stable, reliable connection.

  • Accepting Windows “Scan and Fix” on the clone

    When you plug in the cloned drive in Windows, a prompt may offer to scan and fix it. Click Cancel immediately. Allowing Windows to repair the clone can destroy the file structure that R-Studio needs to recover your files.

Frequently asked questions

Hard drive recovery, answered

Have questions about data recovery? Here are answers to the most common concerns.

What should I do if my hard drive is clicking?

Stop powering the drive on immediately. Clicking is a clear sign of a read/write head failure. Each additional power cycle risks the failed head dragging across the platter surface and permanently scratching away data. Software recovery tools cannot address a hardware head failure. Professional cleanroom head-stack replacement using a matched donor drive is required.

What should I do if my hard drive is not spinning?

A non-spinning drive indicates PCB (circuit board) failure or a seized spindle motor. DIY PCB swaps require matching a donor board exactly and transferring the ROM chip - and on many modern drives, the MCU. Both require professional microsoldering or BGA rework equipment. Motor seizure requires cleanroom disassembly. Stop all power cycles and contact a professional recovery service.

Should I run CHKDSK to try to fix my drive?

Never run CHKDSK on the original patient drive. CHKDSK writes to the drive, which can overwrite recoverable sectors and corrupt the file system structures that recovery software relies on. If CHKDSK is needed at all, run it only on the cloned copy after the clone is complete - never on the original failing drive.

What are the signs that professional recovery is needed?

Seek professional help if: ddrescue recovered less than 50% of the drive after both passes; R-Studio shows a blank, empty, or heavily corrupted file structure; the drive was clicking, beeping, or grinding at any point; the drive is not recognized by the computer; or CrystalDiskInfo reports Bad health. All of these indicate physical or firmware-level failure beyond the reach of DIY software tools.

What is a hard drive diagnostic tool?

A hard drive diagnostic tool is software or an interactive guide that helps you identify what is wrong with a failing hard drive. It evaluates symptoms like spinning behavior, unusual sounds, SMART health status, and whether the drive is detected - then routes you to the safest recovery path or advises professional help when DIY is not viable.

What does “Bad” in CrystalDiskInfo mean?

A Bad SMART status means one or more of the drive’s critical health attributes have exceeded their failure threshold - for example, too many reallocated sectors or pending uncorrectable errors. The drive is actively failing. Continuing DIY recovery on a drive in this state can permanently destroy data that would otherwise be recoverable. Professional recovery is strongly recommended.

What is ddrescue and how does it differ from a regular copy?

GNU ddrescue creates a sector-level image of a failing drive onto a healthy target. Unlike a file copy, it skips problematic sectors on the first pass to minimize stress, retries them in a second pass, and saves a log file so the process can be paused and resumed safely. It is designed specifically to extract the maximum amount of data from a damaged drive.

Why should I clone the drive before recovering files?

Scanning or recovering files directly from a failing patient drive stresses it further and can permanently overwrite sectors still containing recoverable data. Cloning first with ddrescue creates a stable copy you can work from repeatedly. All file recovery happens on the clone - the original patient drive is never touched again after cloning.

What if my drive spins up then spins down?

This means the drive’s startup sequence is failing because the read/write heads cannot initialize. The drive shuts itself down as a self-protection mechanism. Software tools cannot help because the drive powers down before any data transfer can begin. Professional cleanroom head replacement is required. Do not continue powering the drive on.

What if my drive is not detected in CrystalDiskInfo?

If the drive does not appear, the computer is not communicating with it. For external drives, remove the drive from the enclosure and try connecting it directly via SATA - the USB bridge may be failing. If it still does not appear via SATA, firmware issues or deeper hardware failure are likely. Do not continue DIY attempts; professional evaluation is needed.

Can I save recovered files to my computer’s internal drive?

Yes, as long as the internal drive has enough available free space. The critical rule is: never save recovered files to the cloned drive or the original patient drive. A separate external drive is the recommended destination, but your internal drive is also valid if it has sufficient space - as long as it is neither the clone nor the patient.

Do you offer cleanroom data recovery?

Yes. MDRepairs offers professional data recovery services including cleanroom head stack replacement for mechanically failed drives, PCB repair and ROM/MCU transfer for non-spinning drives, and firmware-level recovery. We provide a $100 diagnostic to determine the root cause of failure, backed by a no-data, no-charge policy - you only pay if your data is successfully recovered.

Get professional help

Beyond DIY? We recover what software can’t.

If the diagnostic tool or this guide has identified a failure that is beyond DIY recovery, professional data recovery is the appropriate next step. MDRepairs offers evaluation and recovery for drives with physical and firmware-level failures.

  • Professional cleanroom for head stack replacement and motor repair
  • PCB repair, ROM chip transfer, and MCU-level work
  • $100 diagnostic - no data, no charge
  • Firmware-level recovery and bypass

Explore hard drive recovery services or our mail-in recovery program for the rest of the country.

Lost your data? We’ll get it back.

Expert diagnostics on every case. If we can’t recover your data, you don’t pay.

Professional data recovery from our Lincroft, NJ lab. Every device, every brand, nationwide mail-in service. No data, no charge.